Using OpenShift for accelerated Data Analytics
Introduction-
In this tutorial we are going to present the necessary steps in order to run FPGA-accelerator aware Jupyter Notebooks over OpenShift.
Red Hat OpenShift is a Kubernetes distribution focused on developer experience and application security. OpenShift helps you develop and deploy applications to one or more hosts. These can be public facing web applications, or backend applications, including micro services or databases.
Build your Red Hat OpenShift environment on AWS-
The deployment process includes these steps:
-
Sign up for a Red Hat subscription.
-
If you don't already have an AWS account, sign up at https://aws.amazon.com.
-
Get an InAccel license key, if it's the first time that you use InAccel toolset.
-
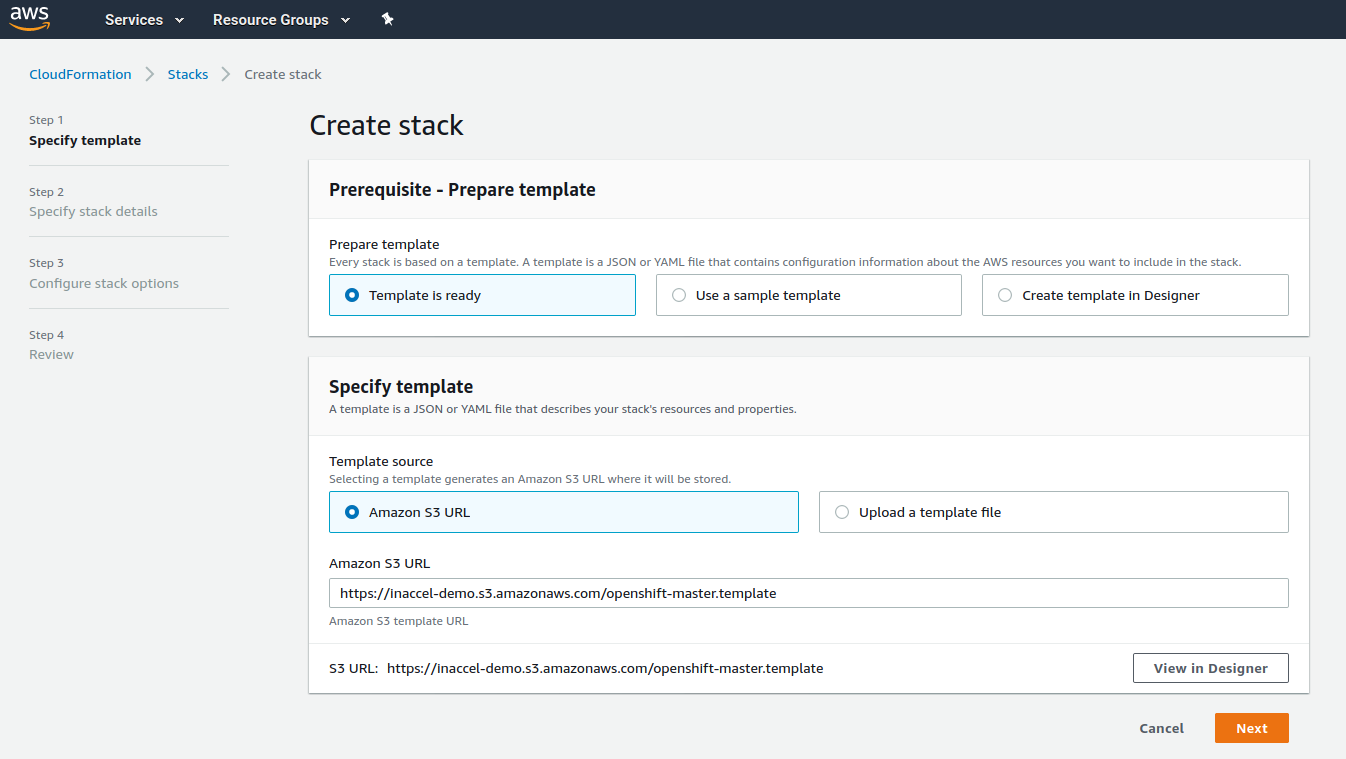
Launch the Quick Start. Each deployment takes about 1.5 hours.
-
Specify stack details. Please make sure that the following parameters are set correctly:
Parameter Description Allowed External Access CIDR The CIDR IP range that is permitted to access the instances SSH Key Name The name of an existing public/private key pair OpenShift UI Password Password for OpenShift Admin UI Red Hat Subscription Information Redhat RHN User Name, Password and PoolID InAccel Information InAccel License Key When you’re done, click Next.
Hint
If you don’t have easy access to the Red Hat Subscription Manager, you can launch a RHEL instance on AWS to determine whether your account includes the necessary subscription and associated pool ID. Run the following on the instance to access your account and get a list of your available subscriptions. The output may include a number of sections, use the pool ID of the section that includes something like Red Hat OpenShift Enterprise and has available entitlements.
-
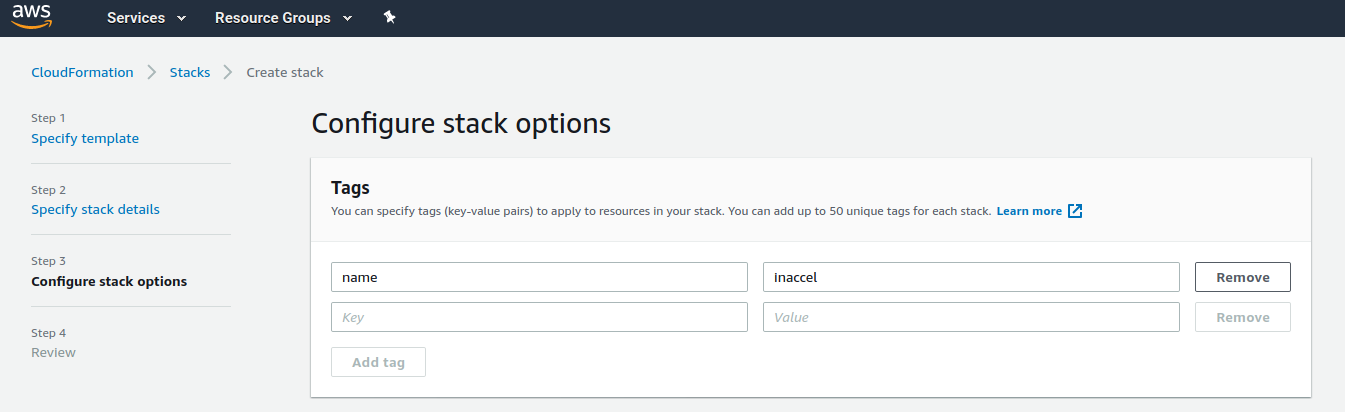
Specify tags (key-value pairs) to apply to resources in your stack.
-
On the Review page, review and confirm the template as well as the stack details. In Capabilities section, tick the boxes to acknowledge that the template might create IAM resources. Finally click the Create stack button to deploy the CloudFormation stack.
-
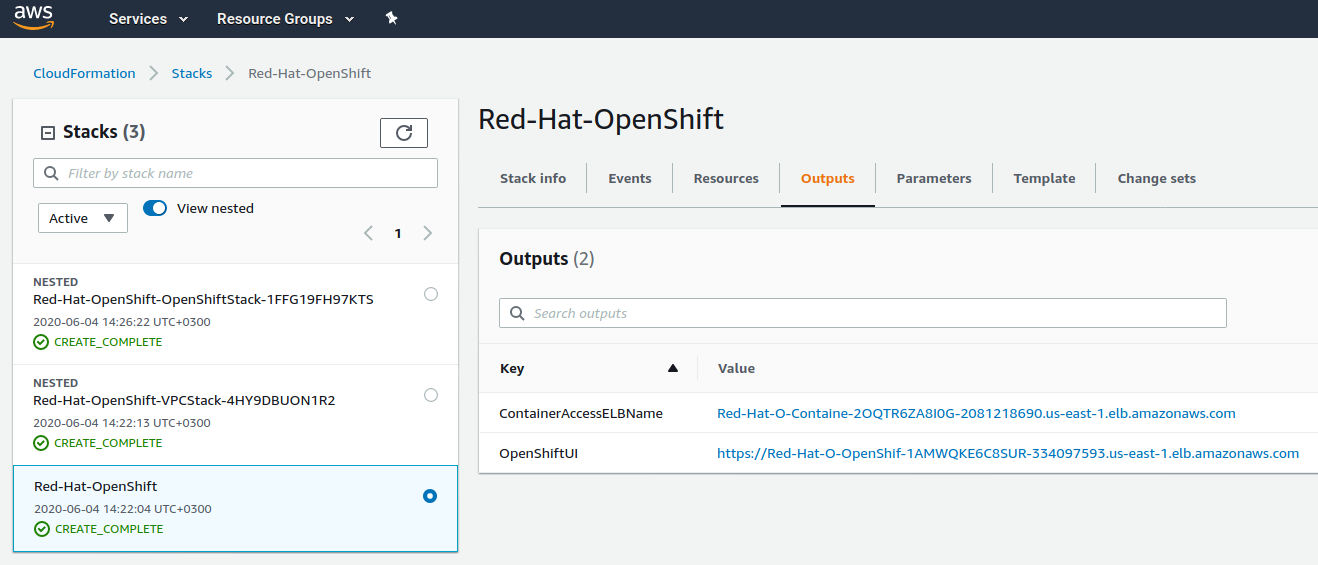
Monitor the status of the stack. When the status becomes
CREATE_COMPLETE, the OpenShift Container Platform cluster is ready. -
Use the URLs displayed in the Outputs tab for the stack to view the resources that were created.
If you need more details on how to customize further your deployment, check the full AWS Deployment Guide.
Gain insight into OpenShift Container Platform + InAccel stack
Using InAccel OpenShift template the EC2 nodes of the cluster with available FPGAs (f1.2xlarge, f1.4xlarge, f1.16xlarge) are automatically:
- Pre-configured with the required FPGA drivers
- Upgraded to the latest stable version of the Docker engine
- Set up with the InAccel toolset (using the related Ansible role)
Finally InAccel FPGA Operator is deployed to the underlying Kubernetes cluster (using the related Helm chart).
Adding Support for FPGA-enabled Jupyter Notebooks-
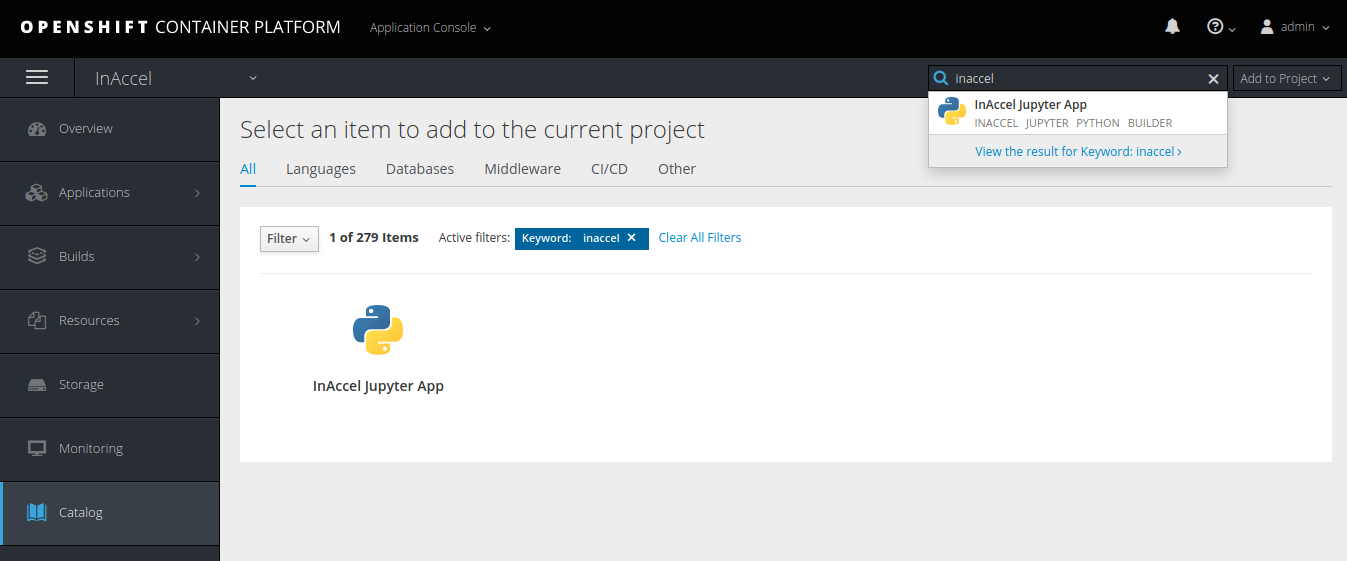
To make it easy to deploy Jupyter Notebooks from the OpenShift web console, the first thing we are going to do is to load in an image stream definition. This is a definition which tells OpenShift where an existing Docker-formatted image can be found for running an InAccel Jupyter Notebook instance. The image stream definition also specifies metadata which helps OpenShift categorise any images. Using that information OpenShift can then add InAccel Jupyter App as a choice in the catalog of applications available for installation from the web console.
To load the image stream definition from the web console, you can select Import YAML/JSON and copy & paste the definition from the following snippet into the related field and click Create.
Click here to view the full template!
apiVersion: v1
kind: Template
message: 'The Jupyter Notebook is running at: .../?token=${APPLICATION_TOKEN}'
metadata:
  annotations:
    description: Turn a Git repo into a collection of interactive notebooks
    iconClass: icon-python
    openshift.io/display-name: InAccel Jupyter App
    tags: inaccel,jupyter,python,builder
  name: inaccel-jupyter-app
parameters:
- displayName: Application Name
  name: APPLICATION_NAME
  required: true
- displayName: Application Token
  from: '[a-z0-9]{48}'
  generate: expression
  name: APPLICATION_TOKEN
  required: false
- displayName: Git repository URL
  name: GIT_URI
  required: true
- displayName: Git branch or tag
  name: GIT_REF
  required: true
  value: master
- displayName: Path to a notebook directory (optional)
  name: CONTEXT_DIR
  required: false
- displayName: FPGA Platform
  name: FPGA_LIMIT_KEY
  required: true
- displayName: Number of FPGAs
  name: FPGA_LIMIT_VALUE
  required: true
objects:
- apiVersion: v1
  kind: BuildConfig
  metadata:
    labels:
      app: ${APPLICATION_NAME}
    name: ${APPLICATION_NAME}
  spec:
    output:
      to:
        kind: ImageStreamTag
        name: ${APPLICATION_NAME}:latest
    source:
      contextDir: ${CONTEXT_DIR}
      git:
        ref: ${GIT_REF}
        uri: ${GIT_URI}
      type: Git
    strategy:
      sourceStrategy:
        from:
          kind: DockerImage
          name: inaccel/jupyter:lab
        scripts: 'https://raw.githubusercontent.com/jupyter/docker-stacks/master/examples/source-to-image'
      type: Source
    triggers:
    - type: ConfigChange
- apiVersion: v1
  kind: DeploymentConfig
  metadata:
    labels:
      app: ${APPLICATION_NAME}
    name: ${APPLICATION_NAME}
  spec:
    replicas: 1
    selector:
      app: ${APPLICATION_NAME}
      deploymentconfig: ${APPLICATION_NAME}
    strategy:
      type: Recreate
    triggers:
    - type: ConfigChange
    - type: ImageChange
      imageChangeParams:
        automatic: true
        containerNames:
        - jupyter-notebook
        from:
          kind: ImageStreamTag
          name: ${APPLICATION_NAME}:latest
    template:
      metadata:
        annotations:
          alpha.image.policy.openshift.io/resolve-names: '*'
        labels:
          app: ${APPLICATION_NAME}
          deploymentconfig: ${APPLICATION_NAME}
      spec:
        automountServiceAccountToken: false
        containers:
        - command:
          - start-notebook.sh
          - --NotebookApp.token=${APPLICATION_TOKEN}
          image: ${APPLICATION_NAME}:latest
          name: jupyter-notebook
          ports:
          - containerPort: 8888
            protocol: TCP
          resources:
            limits:
              ${FPGA_LIMIT_KEY}: ${FPGA_LIMIT_VALUE}
        securityContext:
          supplementalGroups:
          - 100
- apiVersion: v1
  kind: ImageStream
  metadata:
    labels:
      app: ${APPLICATION_NAME}
    name: ${APPLICATION_NAME}
- apiVersion: v1
  kind: Route
  metadata:
    labels:
      app: ${APPLICATION_NAME}
    name: ${APPLICATION_NAME}
  spec:
    port:
      targetPort: 8888-tcp
    tls:
      insecureEdgeTerminationPolicy: Redirect
      termination: edge
    to:
      kind: Service
      name: ${APPLICATION_NAME}
- apiVersion: v1
  kind: Service
  metadata:
    labels:
      app: ${APPLICATION_NAME}
    name: ${APPLICATION_NAME}
  spec:
    ports:
    - name: 8888-tcp
      port: 8888
      protocol: TCP
      targetPort: 8888
    selector:
      app: ${APPLICATION_NAME}
      deploymentconfig: ${APPLICATION_NAME}
    type: ClusterIP
Having loaded the image stream definitions, InAccel Jupyter App will now be able to be selected from the catalog of applications that can be installed from the UI.
For a complete walkthrough on how to deploy a new FPGA-accelerated Jupyter application check the following step-by-step tutorial: