Rolling your own Bitstream Repository
In this lab we will demonstrate how you can easily setup your own private Bitstream Repository based on JFrog Artifactory and served via HTTPS. For the installation we will use Artifactory OSS Docker image that can be pulled from Bintray and run as a Docker container.
To do this, you need to have Docker client properly installed and configured on your machine. For details about installing and using Docker, please refer to the Docker documentation.
If you already have admin access to an existing JFrog installation, feel free to skip the first 2 steps of this tutorial and learn how to Setup a new Bitstream repository.
1. NGINX proxy + Let's Encrypt-
If you are planning to expose this repository both inside and outside your organisation, you may want to guarantee stable and secure access from anywhere. For this purpose, we recommend using a reverse proxy server based on NGINX accompanied by automated creation, renewal and use of Let's Encrypt (SSL/TLS) certificates.
Warning
Certificates will only be issued for domains that correctly resolve to the host, provided the host is publicly reachable on both port 80 and 443.
-
NGINX proxy-
To enable the NGINX reverse proxy simply run the following Docker command, with the specified configuration.
inaccel.conf:
The above parameter, instructs NGINX proxy to accept POST requests of any size. Depending on the target platform, FPGA binaries can be significantly large, which makes this configuration crucial in most of the cases.
docker run --detach \ --name nginx-proxy \ --publish 80:80 \ --publish 443:443 \ --volume /etc/nginx/certs \ --volume /etc/nginx/vhost.d \ --volume /usr/share/nginx/html \ --volume /var/run/docker.sock:/tmp/docker.sock:ro \ --volume ${PWD}/inaccel.conf:/etc/nginx/conf.d/inaccel.conf:ro \ jwilder/nginx-proxy -
Let's Encrypt-
Then we will start the container responsible for the automated generation of SSL/TLS certificates, that will accompany NGINX proxy.
2. JFrog Artifactory-
Since the Artifactory instance running in a Docker container is mutable, all data and configuration files will be lost once the container is removed. If you want your data to persist (for example when upgrading to a new version), you need to store them on an external volume mounted to the Docker container.
The example below creates a Docker named volume called artifactory_data and mounts it to the Artifactory container under /var/opt/jfrog/artifactory.
By default, the named volume is a local directory under /var/lib/docker/volumes/<name>, but can be set to work with other locations. For more details, please refer to the Docker documentation on how to use volumes.
Use now the following Docker command to run JFrog artifactory, shielded by NGINX proxy - Let's Encrypt companion. If you skipped the first step, just make sure that you publish port 8081 to make it available from the host directly (e.g. --publish 80:8081).
docker run --detach \
    --name artifactory \
    --env EXTRA_JAVA_OPTIONS='-server -Xms512m -Xmx4g -Xss256k -XX:+UseG1GC' \
    --env "LETSENCRYPT_HOST=${YOUR_DOMAIN}" \
    --env "LETSENCRYPT_EMAIL=${EMAIL}" \
    --env "VIRTUAL_HOST=${YOUR_DOMAIN}" \
    --env "VIRTUAL_PORT=8081" \
    --expose 8081 \
    --restart always \
    --ulimit nproc=65535 \
    --ulimit nofile=32000:40000 \
    --volume artifactory_data:/var/opt/jfrog/artifactory \
    docker.bintray.io/jfrog/artifactory-oss:latest
docker run --detach \
    --name artifactory \
    --env EXTRA_JAVA_OPTIONS='-server -Xms512m -Xmx4g -Xss256k -XX:+UseG1GC' \
    --publish 80:8081 \
    --restart always \
    --ulimit nproc=65535 \
    --ulimit nofile=32000:40000 \
    --volume artifactory_data:/var/opt/jfrog/artifactory \
    docker.bintray.io/jfrog/artifactory-oss:latest
Once the Artifactory container is up and running, you access Artifactory in the usual way by browsing to https://${YOUR_DOMAIN}/artifactory or http://${SERVER_IP}/artifactory respectively.
Artifactory has a default user with admin privileges predefined in the system:
- User:
admin - Password:
password
We strongly recommend changing the admin password as soon as installation is complete, ideally during the welcome wizard set up.
3. Setup a new Bitstream repository-
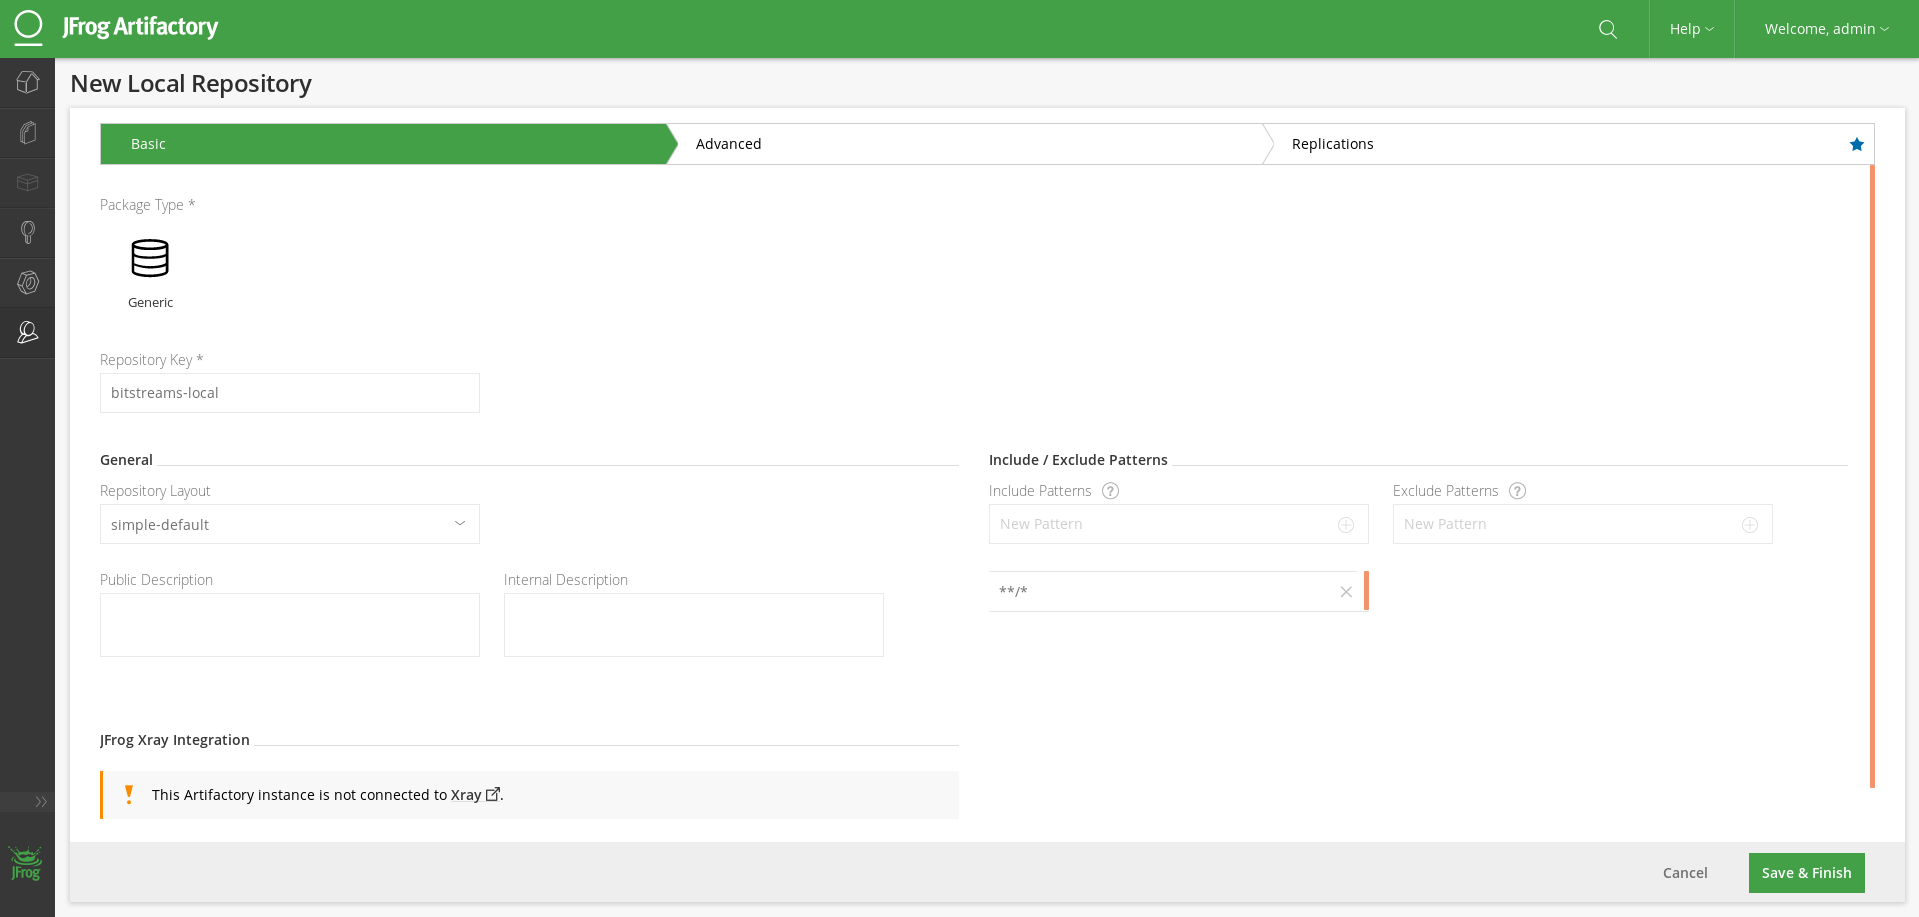
Assuming that you now have a JFrog artifactory installation and a user with admin privileges we can move on the repository creation. Since InAccel packaging format is not yet part of the official JFrog integrations, we will base our Bitstream repository on the Generic package type. Generic repositories have no particular type, and allow you to upload packages of any type in any layout.
To create a new Local repository, in the Admin module, go to Repositories | Local and click New to display the New Local Repository screen. Make sure that your repository configuration is similar to the one in the screenshot below, save and finish!
-
Aggregate local and remote repositories (optional)-
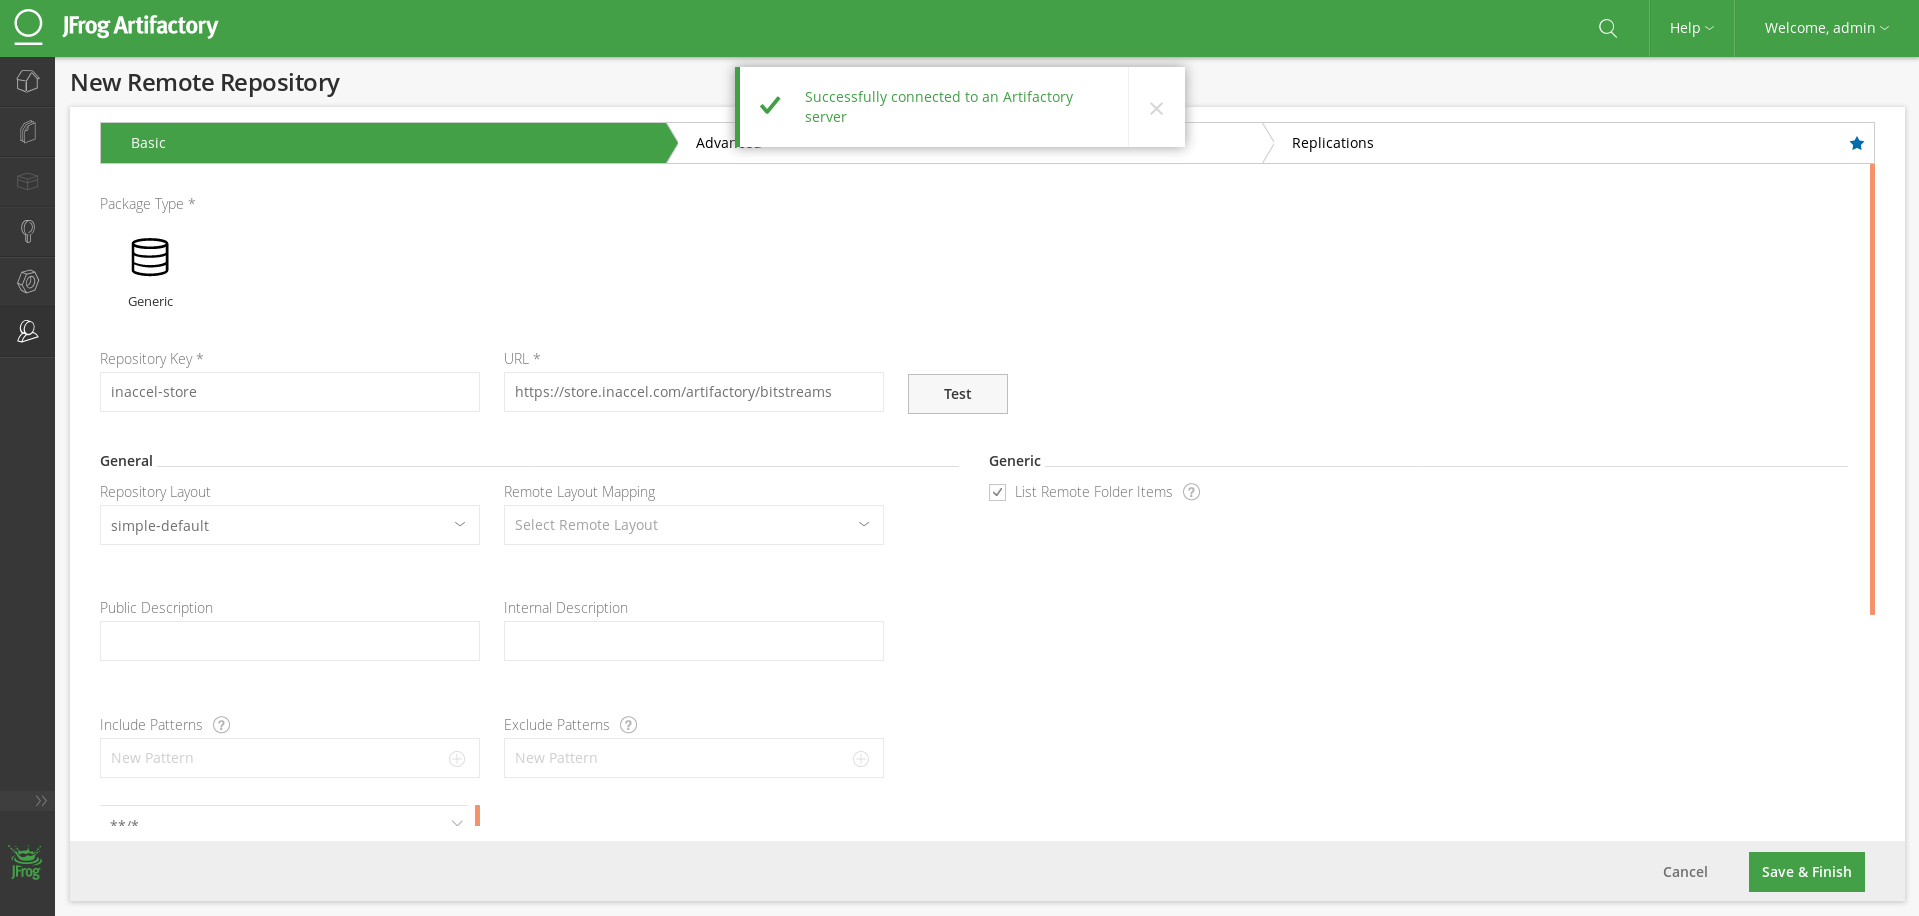
JFrog gives you the capability to proxy and cache any Remote repository, but also aggregate all these (local and remote) resources under a single Virtual repository.
For example, to extend your local Bitstream repository with the accelerators at InAccel Store, you will first have to include it in your Remote Repositories. To do so, create a new repository of that type and use https://store.inaccel.com/artifactory/bitstreams as the remote Artifactory server URL.
Then add a new virtual repository (
bitstreams) that will gather resources both from your local Bitstream repo and InAccel Store.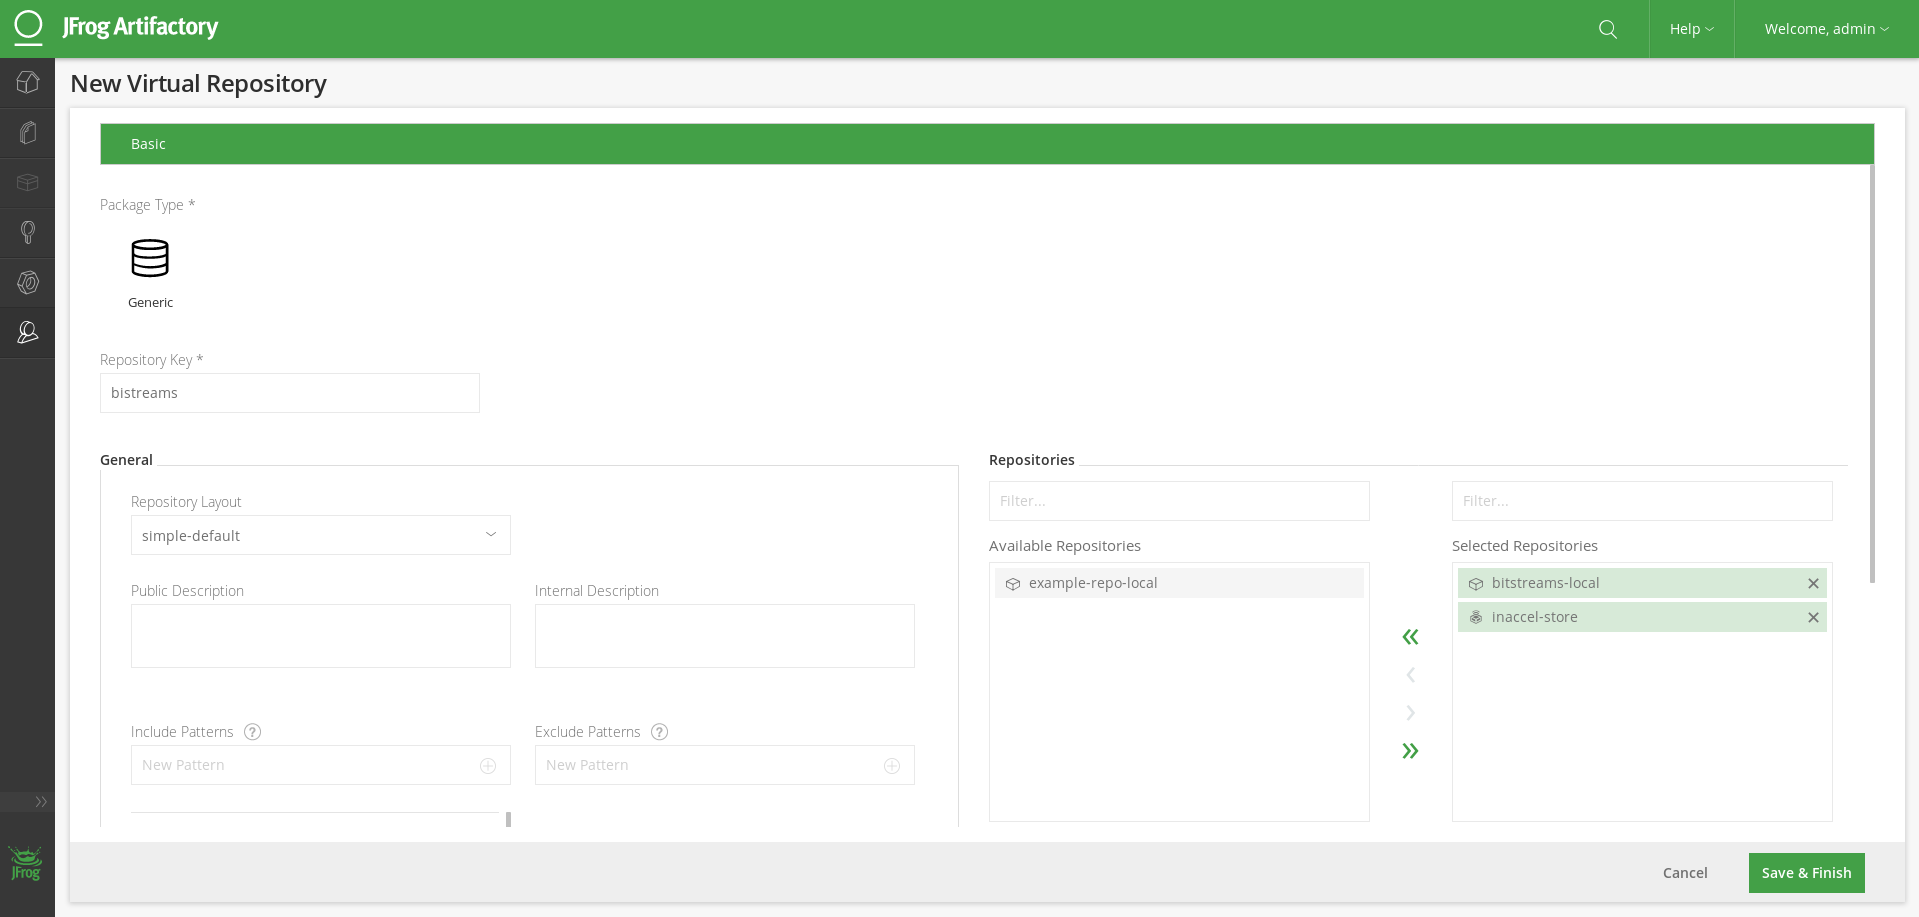
Warning
If you wish to use the same URL both for resolving artifacts from your virtual repository and deploying artifacts to your local repository, select
bitstreams-localas the Default Deployment Repository in the above screen.
4. Deploy and Resolve Bistream artifacts-
In this final step we will show you how to use InAccel CLI to deploy your bitstreams from your development machines directly to your new Bitstream repository and then resolve them in your runtime environment where your Coral FPGA resource manager instance runs. For detailed installation instructions, of InAccel command line, click here.
Configure
You can persist the details of a Bitstream repository in your local InAccel settings:
Deploy
You can upload any Bitstream artifact using the following command:
Resolve
You can download a Bitstream artifact directly using the following command:
Info
In our Getting Started guide Part 3 you have the chance to walk through the complete Bitstream lifecycle (development, packaging, deployment and resolution).